Learn how to transfer domain from GoDaddy to Hostinger hassle-free. Follow our comprehensive guide for a smooth transition without losing your online presence.
Transferring your domain from GoDaddy to Hostinger might seem daunting, but with the right guidance, it’s a straightforward process. Whether you’re seeking better hosting services, affordable pricing, or superior customer support, Hostinger offers a compelling alternative. In this guide, we’ll walk you through the steps to seamlessly transfer your domain, ensuring minimal downtime and maximum convenience.
Understanding Domain Transfers
Transferring your domain involves moving the management of your domain name from one registrar to another. When switching from GoDaddy to Hostinger, you retain full control and ownership of your domain while benefiting from Hostinger’s features and services.
Preparing for the Transfer
Before initiating the transfer process, ensure that your domain is eligible for transfer and meets the necessary requirements. Back up your website files, databases, and emails to prevent any data loss during the transition.
Initiating the Transfer
To begin the transfer, unlock your domain from GoDaddy’s control panel and retrieve the authorization code. Then, initiate the transfer process on Hostinger’s platform by providing the necessary details and authorization code.
Verifying Transfer Details
Once initiated, Hostinger will send a verification email to confirm the transfer request. Review the details carefully and authorize the transfer to proceed. Ensure that all information is accurate to prevent any delays or complications.
Completing the Transfer Process
After verification, Hostinger will begin the transfer process, which may take several days to complete. During this period, your website and email services may experience temporary disruptions. Monitor the transfer status through Hostinger’s dashboard for real-time updates.
Updating DNS Settings
Once the transfer is complete, update your domain’s DNS settings to point to Hostinger’s servers. This ensures that visitors are directed to the correct website hosted on the new platform. Verify the DNS changes to ensure seamless accessibility.
Step-by-Step Guide For How To Transfer Domain From Godaddy To Hostinger.
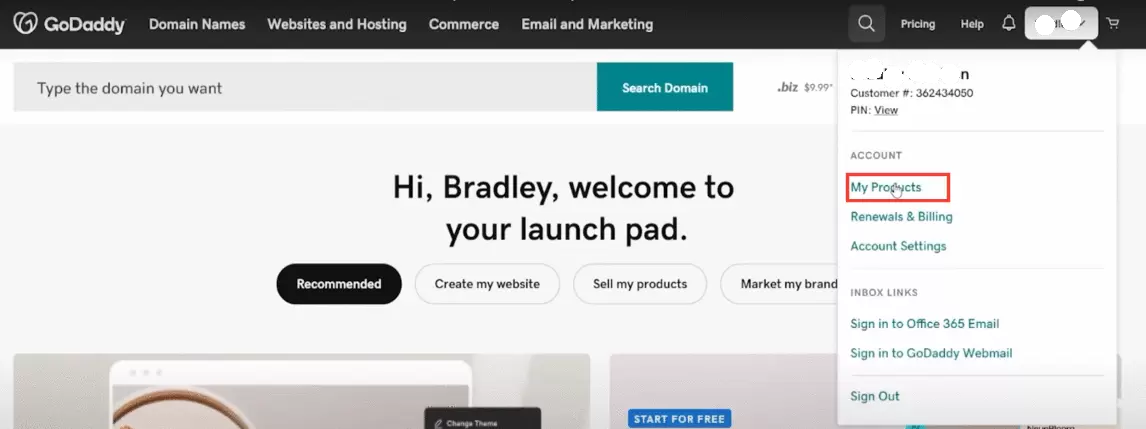
Step 1: Log into the GoDaddy Account
- Go to GoDaddy and log in to your account.
- Navigate to “My Products” to view all your domains.
Step 2: Access Domain Management
- Locate the domain you want to transfer and click on “Manage.”
If you have multiple domains, you can click on “Manager” to see all your domains.
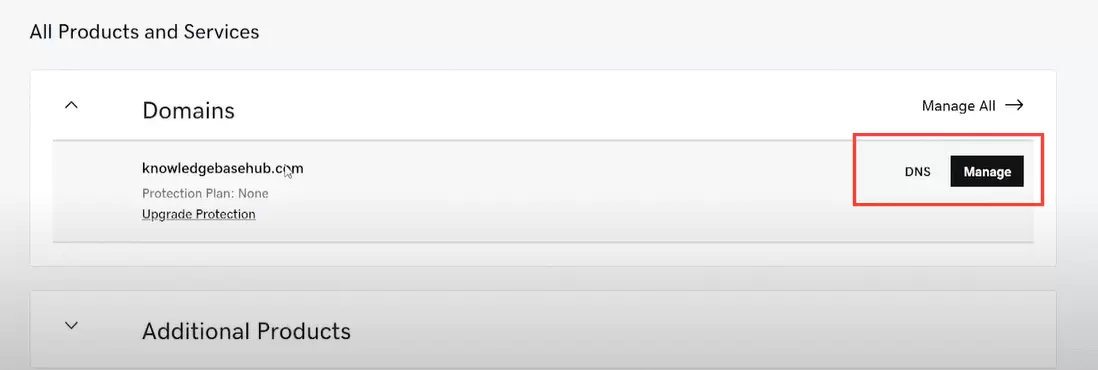
Step 3: Copy Domain Information
- In the domain dashboard, copy the domain name.
Step 4: Log into the Hostinger Account
- Open a new tab, go to Hostinger, and log in to your account.
Step 5: Access Hostinger Domains Section
- Navigate to the “Domains” section in your Hostinger account.
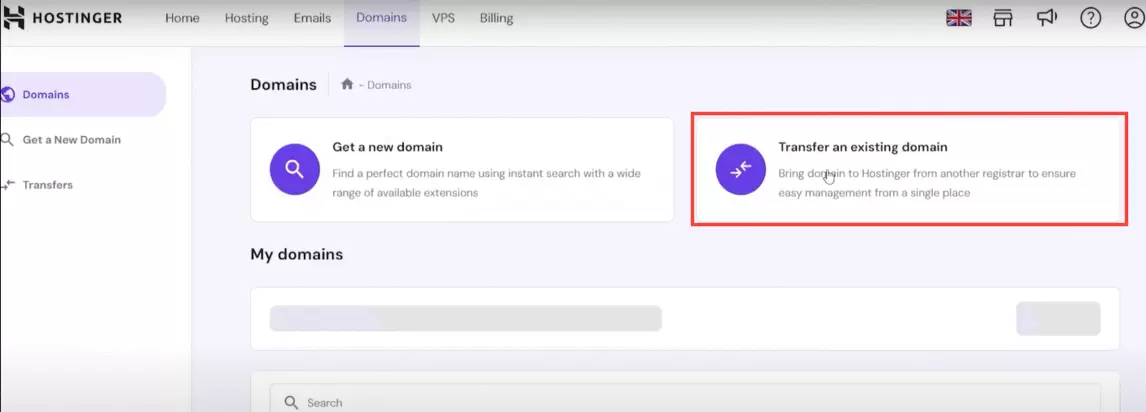
Step 6: Initiate Domain Transfer
- Click on “Transfer an Existing Domain.”
- Paste your domain name into the “Enter a Domain for Transfer” box and click “Transfer Now.”
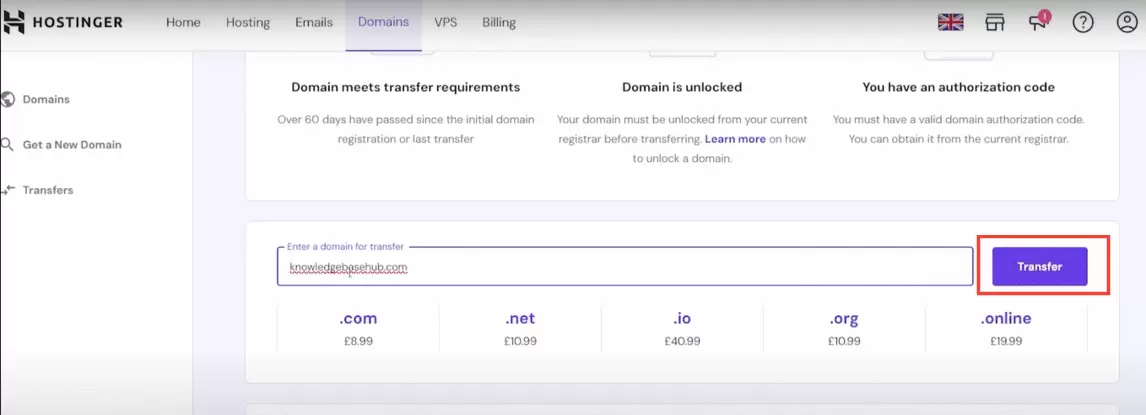
Step 7: Ensure Domain Requirements
- Make sure your domain meets the transfer requirements:
- The domain has been registered for at least 60 days.
- The domain is unlocked.
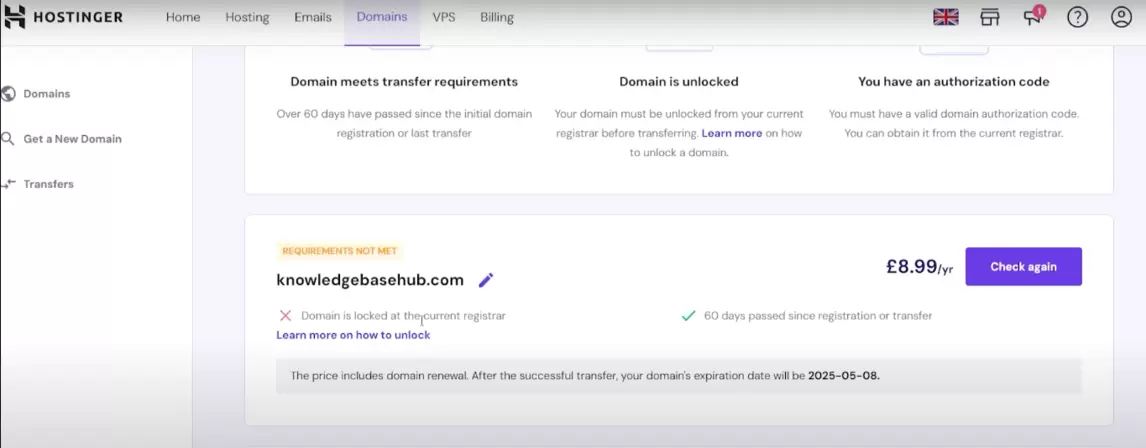
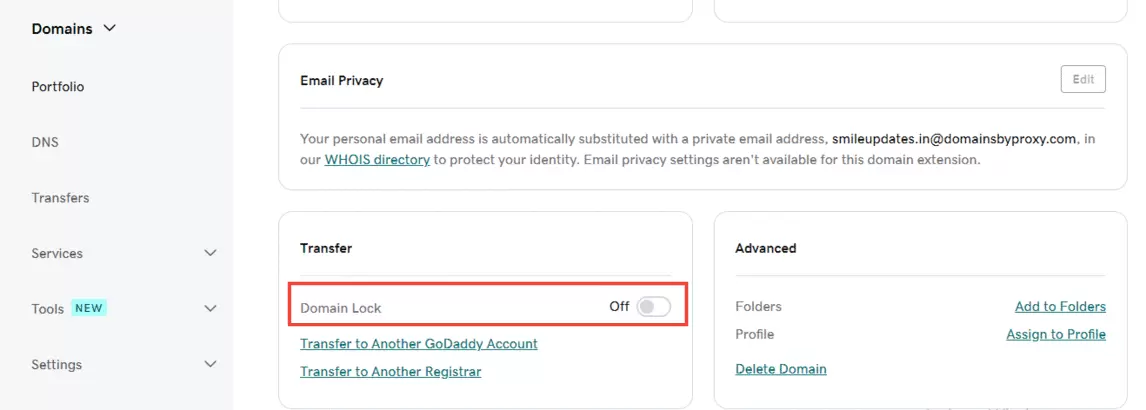
Step 8: Unlock Domain on GoDaddy
- Go back to GoDaddy, click on “Manage Domain,” and scroll to “Domain Lock.”
- Disable the domain lock by agreeing to the prompt.
Step 9: Confirm Unlock Status
- Return to Hostinger and click “Check Again” to confirm the domain is unlocked.
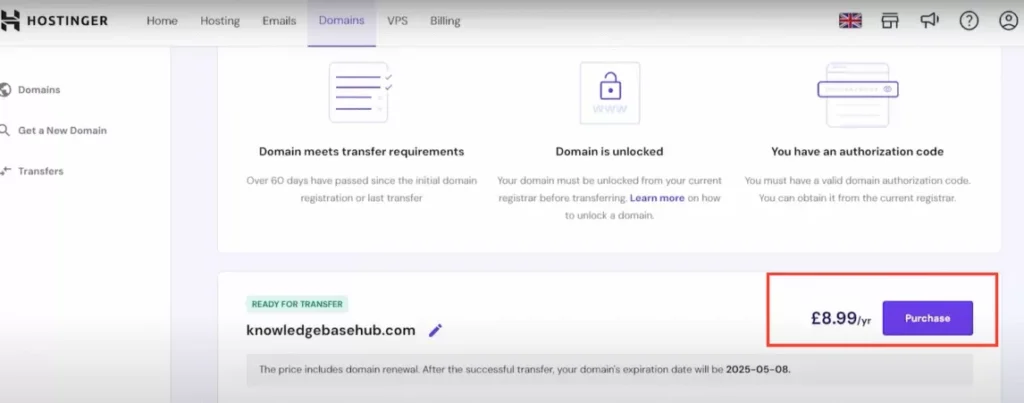
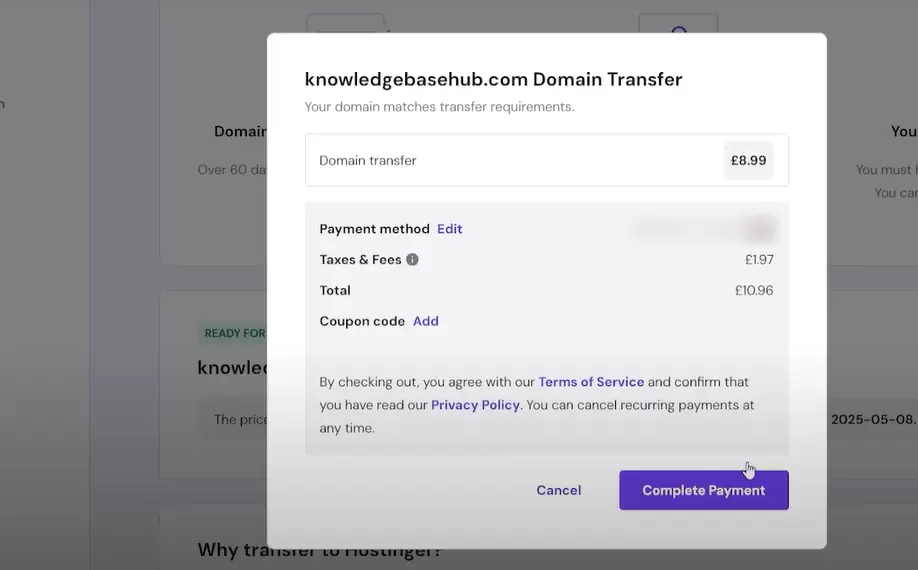
Step 10: Complete Domain Transfer on Hostinger
- Click “Purchase” on Hostinger and provide payment details.
- Verify payment information and complete the payment process.
Step 11: Obtain Authorization Code
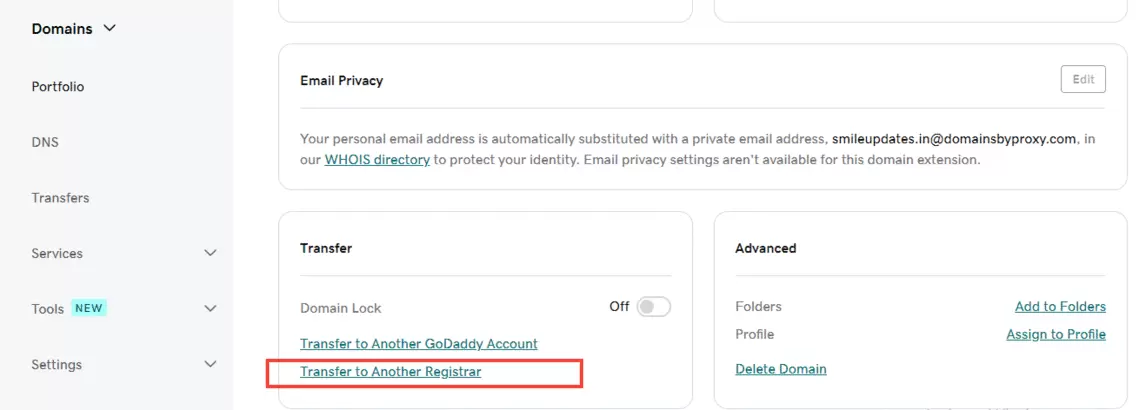
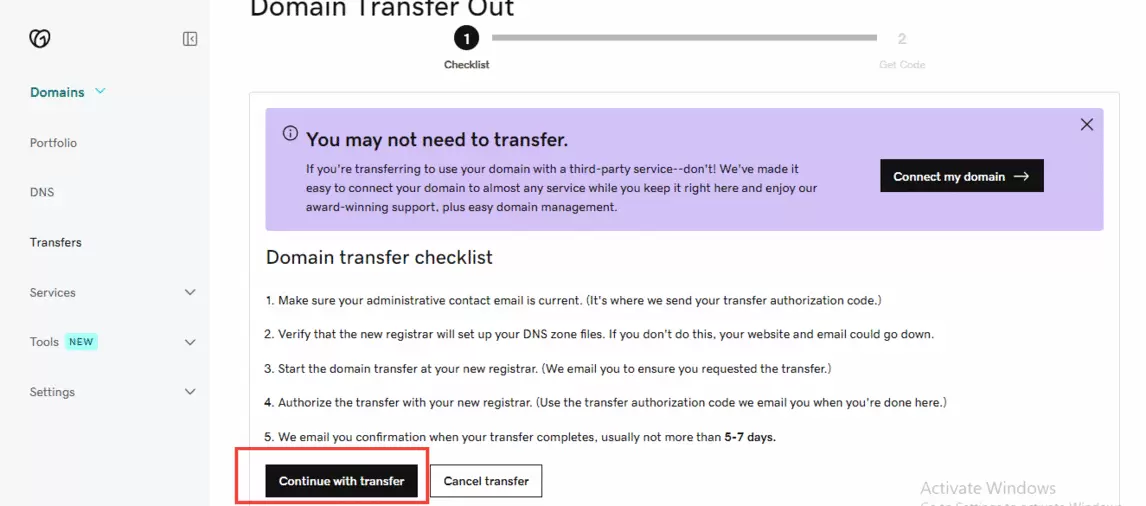
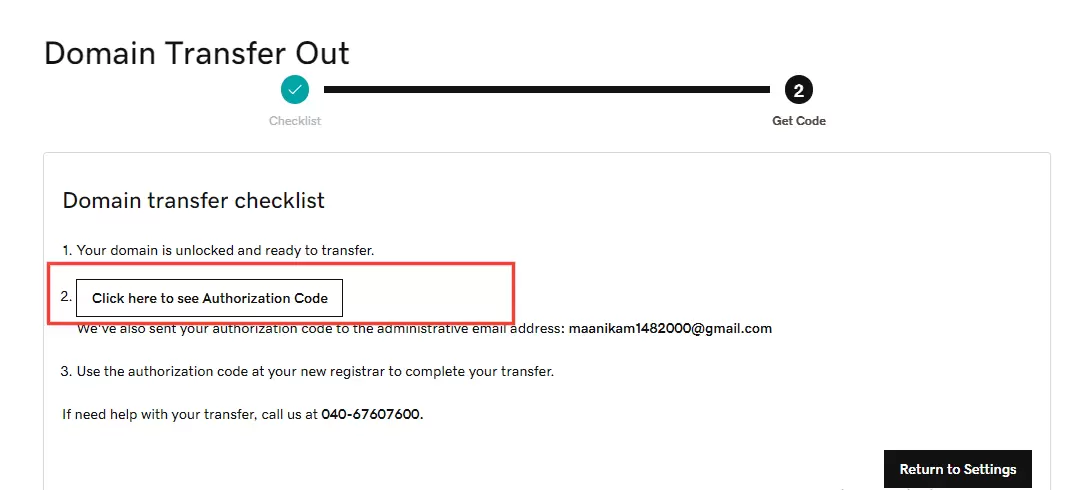
- Go to GoDaddy, click on “Transfer to Another Registrar,” and follow the prompts.
- Obtain the authorization code from GoDaddy.
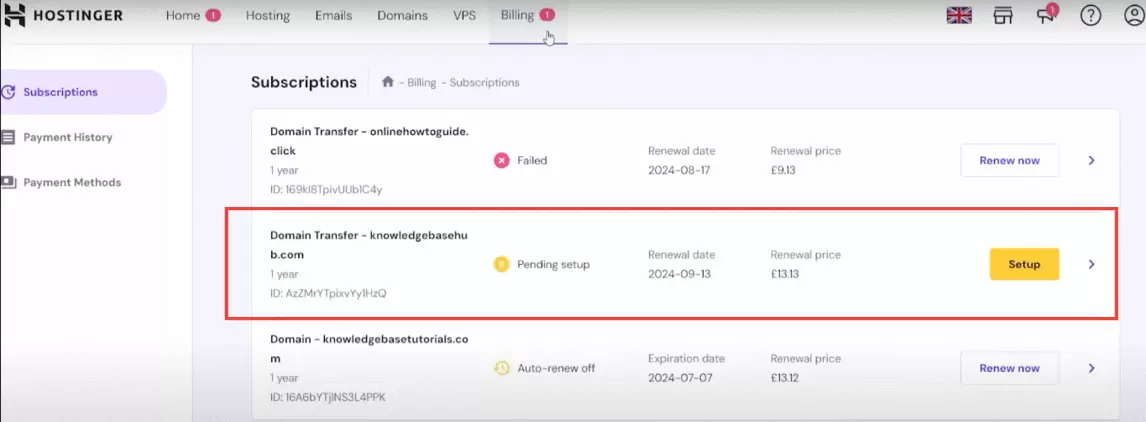
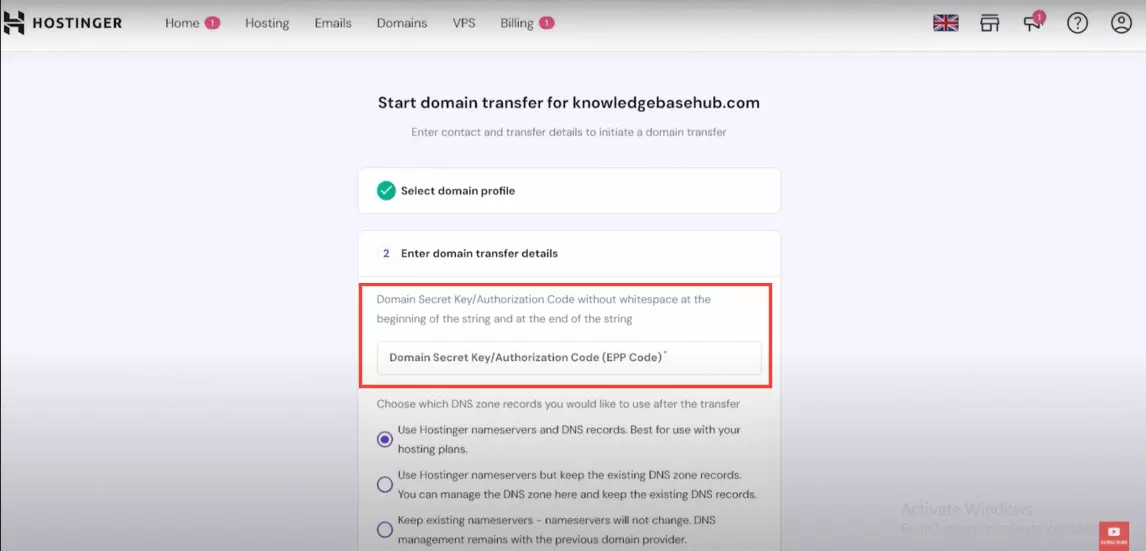
Step 12: Paste Authorization Code
- In Hostinger, go to the “Billing” page and select your domain transfer.
- Click “Setup,” choose an existing profile or add a new one, and click “Select and Continue.”
- Paste the authorization code obtained from GoDaddy.
Step 13: Choose DNS Records
- Choose whether to keep existing DNS records or use default settings on Hostinger.
- Click “Transfer Domain.”
Step 14: Confirm Transfer
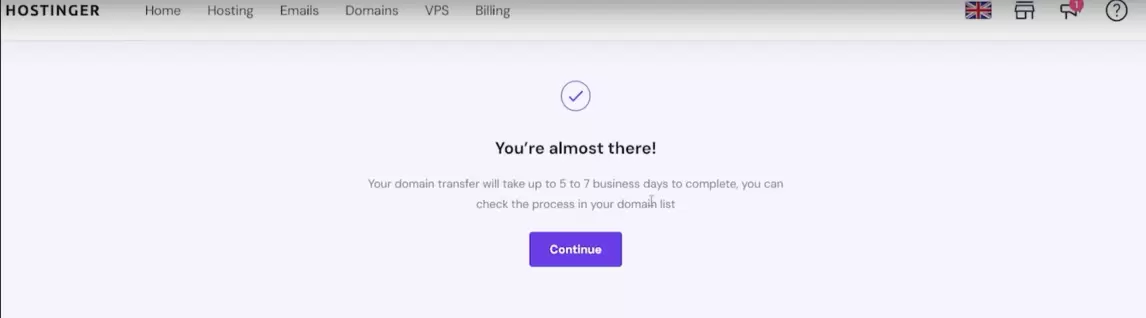
- Hostinger will notify you that the transfer has started.
- Click “Continue” to view the status of your domain transfer.
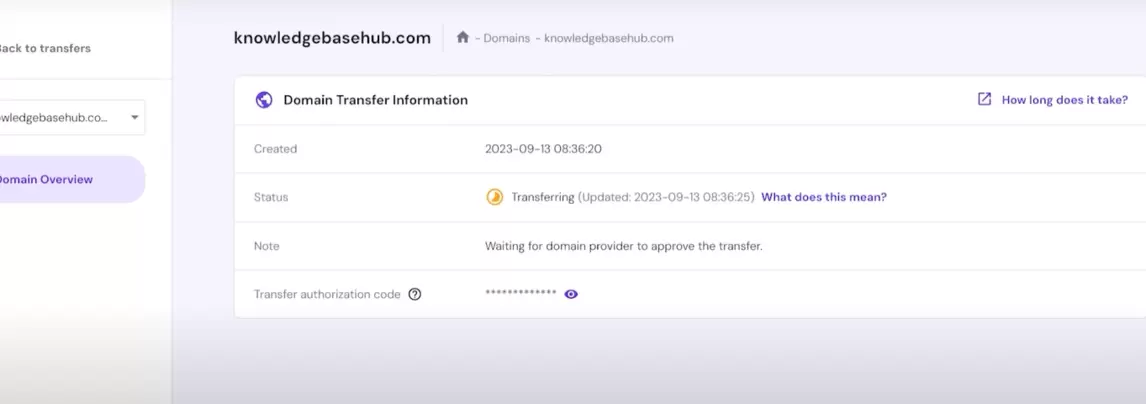
Step 15: Monitor Transfer Status
- In your domain section, check the status; it should say “transferring.”
Note:
– The domain transfer process may take five to seven business days.
– Be patient, and your domain will appear in your Hostinger domain section once the transfer is complete.
FAQs
How long does it take to transfer a domain from GoDaddy to Hostinger?
The domain transfer process typically takes 5 to 7 days to complete, although it may vary depending on various factors such as domain extensions and registrar policies.
Are there any additional costs associated with domain transfers?
While Hostinger does not charge for domain transfers, GoDaddy may impose a transfer-out fee. Be sure to check GoDaddy’s policies and fees before initiating the transfer.
Can I transfer multiple domains simultaneously?
Yes, you can transfer multiple domains to Hostinger simultaneously by following the same process for each domain.
Will my website experience downtime during the transfer?
While efforts are made to minimize downtime, some disruption may occur during the transfer process. Consider scheduling the transfer during off-peak hours to mitigate the impact.
What happens if the transfer fails?
In rare cases where the transfer fails, you will receive notification from Hostinger or GoDaddy detailing the reason for the failure. You can then take necessary actions to resolve the issue and reinitiate the transfer process.
Is it possible to cancel a domain transfer after initiation?
Yes, you can cancel a domain transfer before it is completed. However, once the transfer process has begun, it may not be possible to halt it. Contact Hostinger’s support team for assistance if needed.
Conclusion
Transferring your domain from GoDaddy to Hostinger is a strategic decision to enhance your website’s performance and reliability. Also Read our 3 Best Free Email Marketing Tools and Services for Lookinglion. By following the outlined steps and guidelines, you can seamlessly transition your domain while ensuring continuity of service and minimal disruption to your online presence.


